Hello! Mary here with a quick way to jazz up your chip. These tags are perfect for tying onto packages, labeling storage bins or creating jewelry!
How cute would they be to label your veggies in a Spring garden??
The first couple tags I created are covered in a paper clay, stamped into and covered with a coat of white paint. This is one of my favorite ways to use my chip pieces. Stamp a name or a background stamp for a textured embellishment!
The second set is rockin' a chalkboard look! A quick coat of black paint and a handwritten name with a white gel pen and they were set.
With some of the tags, I just tied my trim around a handle but with others I chose to punch a hole.
Ok guys, that's it for me. I can't wait to tie these cuties on gift packages and give them to a few scrappy sisters at our National Scrapbooking Day festivities!
Thanks so much for joining me and I'll see you next time!!
Hello!! Today, I have a shabby and dimensional ornament (with VIDEO tutorial!) over on the May Artsblog!
Here's a peek...
It's super easy to make and looks amazing on any Christmas tree! If you'd to grab the template I created for this ornament, you can find it HERE. It's perfect for hand cutting or importing into your electronic cutting machine software for tracing to save your fingers some work.
Don't forget to hop on over to the May Arts blog to see my VIDEO TUTORIAL and get the details on all the supplies I used.
We are so excited to have two amazing companies team up for a full day of creativity. This hop will surely get your creative juices flowing so head on over to all these incredibly talented crafters to check out how they've combined the beautiful lines by 7 Dots Studio with Lindy's Stamp Gang products---it's a match made in color heaven!
We have a little surprise for you!
We would love for you to show some love to all our crafters and leave them a little message. You will have the opportunity to win a fabulous prize by both 7 Dots Studio and Lindy's Stamp Gang so please let us know that you have done so by coming back to 7 Dots Studio and Lindy's Stamp Gang blog at the end of the hop.
At the bottom of my post is a full list if you get lost along the way.
Here's what I've come up with...
This sweet little shaker box ornament is packed FULL of LSG and 7 Dots Studio LOVE!! And snow. 'Cuz what's a shaker box without a bit of snow?
I chose to use a neutral paper with just a few pops of Lindy's vibrant color and sparkle for the inside. DIG the color and glitter on that bottle brush tree!
And here's the back...
Lovin' all those layers!
7 Dots Studio paper is rockin' some of the best texture around. Add to that a touch of Lindy's Starburst sprays and stitching??
Divine!!
I'm a big fan of soldering, but wanted to find a way to create the look of a soldered piece that even my non-soldering crafty friends could manage.
Enter washi tape!
A bit of lightweight acrylic, washi tape and some GLITTER later and I had myself a hand-crafted ornament that would make any soldering gun jealous ;-)
Hello there!! Whooooooo wants a tutorial??? Ok, cheesy---I know. I just can't help it!
So, I have to confess...I think birds are kinda creepy. Have you SEEN one UP CLOSE??? *shivers*
In spite of my aversion to our feathery foe, I have to say I do like owls :-) It's a funny story. It all happened this last year...
"My children's school was infested by a family of Burrowing (I think!) Owls. They are super cute, fuzzy, tiny and MEAN!!! They don't care how big you are---they'll eat you. One bite at a time. This family of owls terrorized the school yard all year. They would dive-bomb the teachers, hiss at the children and generally cause mayhem all around them. The school tried to have them humanely removed, but nobody would come and get them. So the chaos continued... Over the summer, I would catch little glimpses of these birds as I would drive by the school. On a light, on the fence, in the road... YES! In. The. Road. As I was driving by one day, I saw one on the side of the road. I slowed down and thought about stopping to help, but when it saw me, it went into full on battle mode. Wings spread, teeth bared (or maybe that part was my imagination!)---ready to eat the car!!! I sat there laughing my butt off. He wasn't scared at all! He was just out on a little walkabout. Apparently, his family had moved into the small, grassy yard next to the Kindergarten building. This is prime real estate! Fenced in and grassy with plenty of shade trees. Every day, as I would drive by, I would see them. There were three babies and two larger owls. I even named the babies---hee-hee! Jack, Evil Eyes and Mothra. Don't ask!!! All summer long, I would obsessively look for these owls. I loved my daily glimpses of them! Then one day, just as school was about to start, the lawn care men came and cleaned house. The owls were gone."
Here's a picture I snapped during parent/teacher conference week. I had to hide under a tree to get that close!!! SOOOO scary! All 6-8 inches of him.
My newfound love of owls led me to buy several owl figurines...AND create this FAB primitive owl ornie tutorial! Check it out!!!
One final note, my son came home from school the other day with a report of an owl siting at his school. They're BAAAAAACCCCCK! Yay!!!
Here's a few cute 'lil paper clay snowmen :-) LOVE!!!
And soooooo easy to make.
Thanks for stopping by!!!
Saturday, December 3, 2011
I recently joined a Handmade Ornament Swap hosted by Cassandra at An Artful Adventure.
As you know, I'm a serious fan of the handmade ornament. I love to make them, and I LOVE to get them!!! So today, I thought I'd share what I made for my swap partners and my FABULOUS returns :-)
Mini Paper Clay Birds...
I used some of my favorite vintage buttons to adorn their little bow ties.
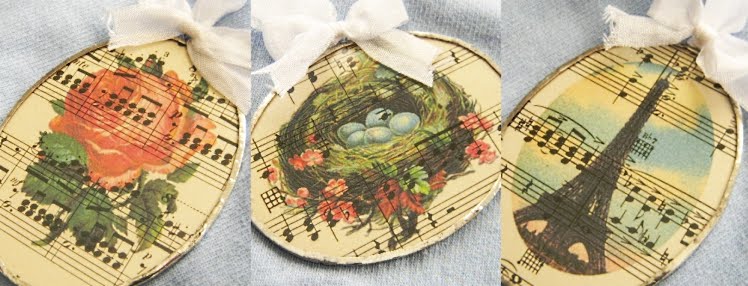
Classic Soldered Glass Ovals...
I recently posted some pictures of prints I'd created using pretty vintage papers. Well, here's one of the projects I've used them in.
Ragdoll Angels...
Vintage applique doilies, mother-of-pearl buttons, and tea-dyed quilt swatches! I've also used a mold of my favorite frozen dolly to make their sweet, little faces :-)
And finally, bleached-bottle brush Christmas Trees!!! When I saw Terri's tutorial on bleaching and coloring your own, I just had to give it a try! I love the bright colors---TOTAL Holiday LOVE!!!
I had the best time playing along with my fellow swappers. My house was a mess for the better part of November, but I have to say it was sooooo worth it :-) Thanks so much for the AMAZING orniments, Ladies!
I've always made handmade ornaments for our family Christmas tree with my mom. Here's a picture of our tree.
I LOVED that shiny, tinsel tree!!! I still have it. Maybe I should put it up this year...
I've happily continued that tradition with my babies. "Babies", of course is a relative term, as they are now 14, 12 and 6! Each year as we unpack our ornaments to decorate our tree, we spend time talking about the years we made each one. Each of them has their favorites, and with boys, hanging ornaments sometimes comes close to a wrestling match!!!
All things considered, I think my crazy and eclectic tree, filled with handmade ornaments from years gone by, is the most beautiful thing! It's everything I hope my "baby's" childhood should be...
SHINY and filled with MEMORIES.
Here's a few pictures of the first ornaments of 2011...
If you love creating ornaments, you should check out this wonderful swap hosted over at An Artful Adventure. There's still a couple of days to join in the fun!!! For more info, check out Cassandra's blog post HERE!